I haven’t been posting in a while. Now it’s time to discuss one of the biggest projects we’ve finished at 4Geeks Academy. Actually, it happened in March 2023, I think. This web app, LocationPro, is made to help you discover new towns in the United States. Not too exciting, but let me explain!
Languages: HTML, CSS, JavaScript, Python
Libraries: React, Redux, React Router, Material UI, Flask
Databases: MySQL, PostgreSQL, SQLAlchemy
Other: Excel
Links: GitHub | View Project
Story
In 2021 after moving to Miami I started a company with a cheesy name, Not Your Average Logistics. I quickly realized here that it’s a bit more difficult to make money because of lower wages and I wanted to see the country. So, I bought a Ford Transit and started driving across the United States. At this point, I saw 48 states (except the smallest and the largest ones) and four Canadian provinces.
This job has whisked me away to corners of the country that once seemed beyond reach. From the majestic Rockies, where I’ve witnessed rams poised gracefully upon precipitous cliffs, to the expansive deserts of Arizona, home to towering saguaros that pierce the sky. I’ve been enchanted by the picturesque terrains of New England and have ventured into the profound depths of the South, where one can almost hear the soulful stirrings of the blues being born.

With this experience I realized that there’s so much of America being undiscovered; especially the medium-sized towns.
During the pandemic, a lot of people started moving around the United States. They ended up residing primarily in the large cities of the “Sun Belt” states which spiked the cost of living in these regions drastically. I can feel it now here in Miami. So, I thought that by letting people discover these places, I could help them find a more affordable place to live that they can enjoy. And that’s how the idea of a LocationPro was born!
The LocationPro App
When I first introduced the app to my instructor, he didn’t get too excited about it. I know, the idea of the app didn’t sound that appealing. In the end, it was just a simple database filter. However, when I and Olga finally demonstrated it, people seemed to get what I wanted to do.
Because we haven’t finished the previous projects on time, we haven’t started working on the LocationPro right away. For the first week, I was in the planning stage. I tried to figure out what to do first.
Honestly, I wanted to use the API that other people have developed. Unfortunately, I quickly realized that even during the development stage I will use most of the free API calls. Plus, I didn’t want to spend a dime. So, my plan was to go in this order:
- Build a huge database of US cities based on multiple parameters
- Develop an API filter to communicate with the database
- Create basic functionality
- Build the front end
- Make sure that it works during the presentation
The Database
After I realized that using third-party API is not an option, I quickly understood that I would lose a few days of building the database for the LocationPro myself.
First, I had to find the data sources. Thankfully, you can get some of it (even if it’s a bit outdated) for free. Some places want money for it, but I avoided those. Remember, we were not spending a dime!
We searched for data everywhere: US Census Bureau, Kaggle, and even blog posts!
After we found the raw data, we had to combine it all together in a single table (I thought of creating multiple tables at first, but I didn’t have much time for it). So here we went: preparing, cleaning, and processing everything we found. In three days the final table of ~20,000 records was completed!
We used everything: from basic Excel sheets to PostgreSQL. However, we ended up settling on MySQL because it can better work with large databases and you get a nice web interface, PhpMyAdmin. So even if you don’t have your computer nearby, you can get access to it.
Now it was time to build the API to communicate with the database.
The API
Due to the fact of how many search parameters there were, we had to build a very sophisticated filtering system using Python. It turned out to be working rather quickly. This is some of the code:
@app.route('/filtered_city_data', methods=['GET'])
def get_filtered_city_data():
    if session:
        try:
            # Get the query parameters
            city_median_income_min = request.args.get('city_median_income_min', type=float)
            city_median_income_max = request.args.get('city_median_income_max', type=float)
            city_median_income_null_is_ok = request.args.get('city_median_income_null_is_ok', type=str, default='false')

            query = session.query(CombinedCityData)
                        if city_median_income_min:
                            if city_median_income_null_is_ok.lower() == 'true':
                                query = query.filter(
                                    (CombinedCityData.city_median_income.between(city_median_income_min, city_median_income_max)) | (CombinedCityData.city_median_income.is_(None))
                                )
                            else:
                                query = query.filter(
                                    CombinedCityData.city_median_income.between(city_median_income_min, city_median_income_max),
                                    CombinedCityData.city_median_income.isnot(None)
                                )
                        if city_population_min:
                            if city_population_null_is_ok.lower() == 'true':
                                query = query.filter(
                                    (CombinedCityData.city_population.between(city_population_min, city_population_max)) | (CombinedCityData.city_population.is_(None))
                                )
                            else:
                                query = query.filter(
                                    CombinedCityData.city_population.between(city_population_min, city_population_max),
                                    CombinedCityData.city_population.isnot(None)
                                )
And something like that we went for almost 300 lines going through every column in the table.
Honestly, I haven’t organized this code very well, because it was my first time really working with Python and Flask, so I didn’t really know what to do. However, it ended up working.
I would write it differently the next time.
The Backend
Besides the filtering system running in the backend, we had to create some additional functionality. For example, adding a city to the user’s favorites:
# THIS END POINT ADDS A CITY TO A USER'S FAVORITES
@app.route('/users/<int:user_id>/favorites/<int:city_id>', methods=['POST'])
@jwt_required()
def add_city_to_favorites(user_id, city_id):
    current_user = get_jwt_identity()

    # Check if the authenticated user exists
    if current_user is None:
        response = make_response(jsonify({'message': 'User not found'}), 404)
        response.headers['Content-Type'] = 'application/json'
        return response

    # Check if the authenticated user is adding a favorite to their own account of someone else's
    if current_user.get('id') != user_id:
        response = make_response(jsonify({'message': 'You are not authorized to add a favorite to this user'}), 403)
        response.headers['Content-Type'] = 'application/json'
        return response

    try:
        # Check if the user and city exist
        user = session.query(User).filter_by(id=user_id).first()
        city = session.query(CombinedCityData).filter_by(id=city_id).first()
        if not user:
            response = make_response(jsonify({'message': 'User not found'}), 404)
            response.headers['Content-Type'] = 'application/json'
            return response
        if not city:
            response = make_response(jsonify({'message': 'City not found'}), 404)
            response.headers['Content-Type'] = 'application/json'
            return response

        # Check if the city is already in the user's favorites
        favorite = session.query(Favorites).filter_by(user_id=user_id, city_id=city_id).first()
        if favorite:
            response = make_response(jsonify({'message': 'City already in favorites'}), 400)
            response.headers['Content-Type'] = 'application/json'
            return response

        # Add the city to the user's favorites
        favorite = Favorites(user_id=user_id, city_id=city_id)
        session.add(favorite)
        session.commit()

        # Return a response indicating success
        response = make_response(jsonify({'message': 'City added to favorites'}), 201)
        response.headers['Content-Type'] = 'application/json'
        return response

    except Exception as e:
        session.rollback()
        response = make_response(jsonify({'message': str(e)}), 500)
        response.headers['Content-Type'] = 'application/json'
        return response
I did run into some issues while writing the backend, but I fixed them in the front end somehow. Yet, now there are some glitches happening. So, hopefully, sometime in the future I’ll be able to make everything work.
Front End
During the BootCamp, we learned how to use Bootstrap, but I didn’t want to spend much time on design, so I found a new library, Material UI, that had a lot of amazing components that we could use. For example, tables! Also, I think that Bootstrap looks quite outdated. Material UI looks outdated too, but less so.
We asked MidJourney to design our logo. It actually did a relatively good job.
Also, at this point, we had less than two weeks left until the final presentation. We had to learn a new library and build the whole front end. So, we went for it.
At first, Material UI looked very complicated, but in the end, it turned out to be quite simple. Just a lot of lines of code. But basically, you just copy-paste everything and then edit. Easy!
I think the only problem is that you have to npm-install a bunch of things for it. Later I discovered Tailwind, and it’s much easier to use.
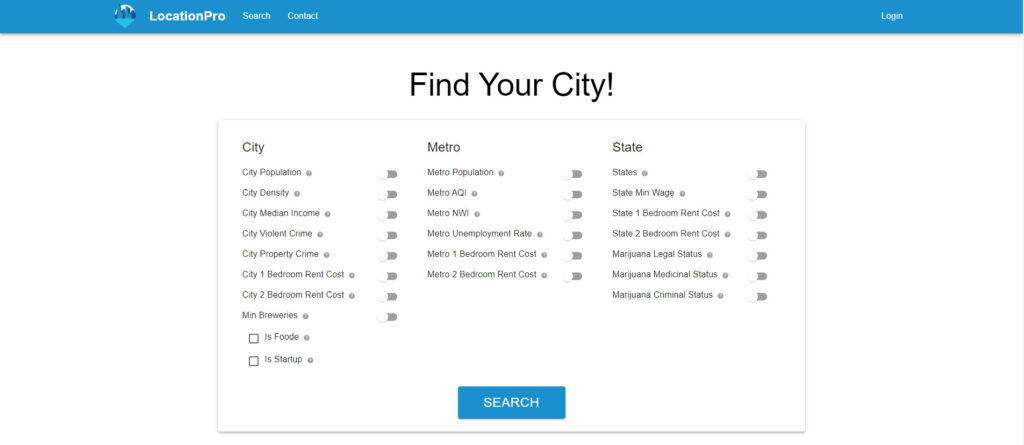
Anyway, this is what the LocationPro interface looks like:

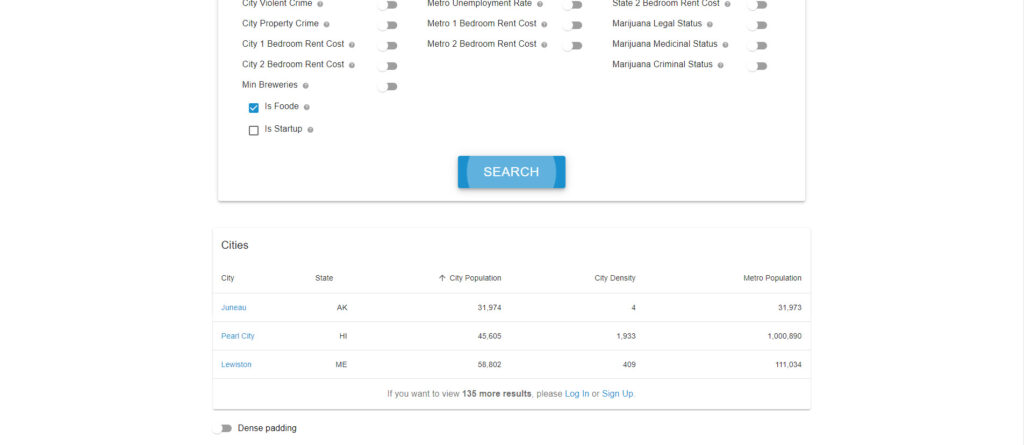
You can toggle any parameter you want, type in some information, and it gives you back what it finds. Like that:

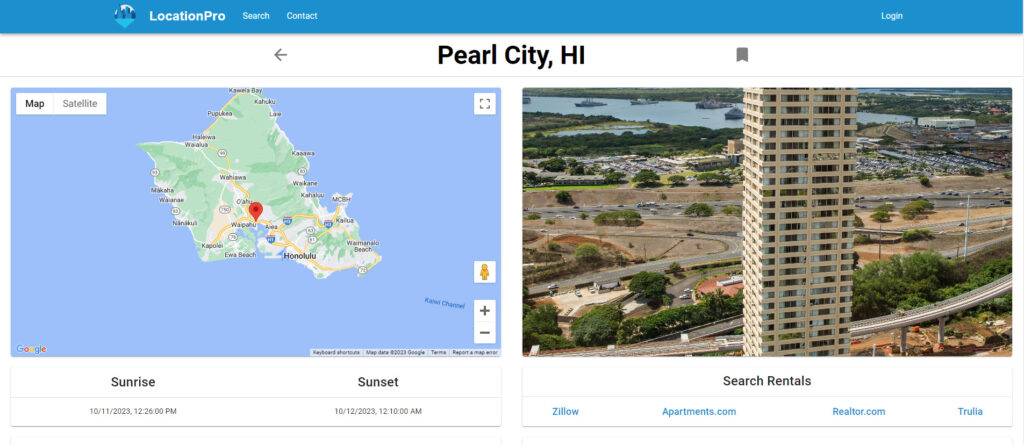
Then you choose a city you like and view the information about it:

I know, it looks very confusing and complicated, so if you want, I can create a video on how to use this app.
Components
The LocationPro app consists of multiple components. For example, the MinMax component:
export default function MinMax({ name, questionMarkText, columnName, onMinChange, onMaxChange, onNAChange, isItActive,
                                                                      minChange, maxChange, NAChange, activeChange }) {
  const [minValue, setMinValue] = useState(minChange); // Initialize to null instead of 0
  const [maxValue, setMaxValue] = useState(maxChange); // Initialize to null instead of 100
  const [value, setValue] = useState([0, 100]); // Initialize with default values
  const [isActive, setIsActive] = useState(activeChange);
  const [isNAChecked, setIsNAChecked] = useState(NAChange);
  const [isNADisabled, setIsNADisabled] = useState(false);
  const [apiCallMade, setApiCallMade] = useState(false); // Checking whether we already made an API call using toggle
  const URL = process.env.REACT_APP_BD_URL; // Defining the database URL


  useEffect(() => {
    if (minValue !== null && maxValue !== null) { // Render only when the API call has completed
      setValue([minValue, maxValue]);
    }
  }, [minValue, maxValue]);

  const handleInputChange = (event, index) => {
    const newValue = event.target.value === '' ? '' : Number(event.target.value);
    const updatedValue = [...value];
    updatedValue[index] = newValue;
    setValue(updatedValue);

    if (index === 0) {
      setMinValue(newValue);
      onMinChange(newValue);
    } else if (index === 1) {
      setMaxValue(newValue);
      onMaxChange(newValue);
    }
  };

  const handleActiveToggle = () => {
    setIsActive(!isActive);
    if (!isActive) {
      if (!apiCallMade) {
        axios
          .get(`${URL}/column_review?column_name=${columnName}`)
          .then(response => {
            setMinValue(response.data.min_value); // Setting the most min value
            onMinChange(response.data.min_value); // Passing that value to SearchBox
            setMaxValue(response.data.max_value); // Setting the most max value
            onMaxChange(response.data.max_value); // Passing it to the SearchBox
            setIsNAChecked(response.data.null_values_exist); // Do we need to check NA?
            onNAChange(response.data.null_values_exist); // Sending it to the SearchBox
            setIsNADisabled(!response.data.null_values_exist); // Making the checkbox disabled if needed
            setApiCallMade(true); // Marking as API call made
            // console.log(response.data)
          })
          .catch(error => {
            console.error(error);
          });
      } else {
        onMinChange(minValue);
        onMaxChange(maxValue);
        onNAChange(isNAChecked);
      }
      isItActive(!isActive);
    } else {
      onMinChange(null);
      onMaxChange(null);
      onNAChange(null);
      isItActive(false);
    }
  };


  const handleNACheck = () => {
    if (isActive && !isNADisabled) {
      setIsNAChecked(!isNAChecked);
      onNAChange(!isNAChecked);
    }
  };


  return (
    <Box sx={{ width: 300 }}>
      <Grid container alignItems="center" justifyContent="space-between">
        <Grid item>
          <Typography id="input-slider" gutterBottom>
            {name}
            <Tooltip title={questionMarkText}>
              <QuestionMark />
            </Tooltip>
          </Typography>
        </Grid>
        <Grid item>
          <Switch checked={isActive} onChange={handleActiveToggle} />
        </Grid>
      </Grid>
      {isActive && (
        <Grid container spacing={2} alignItems="center">
          <Grid item>
            <Checkbox
              checked={isNAChecked}
              disabled={!isActive || isNADisabled}
              onChange={handleNACheck}
              inputProps={{ 'aria-label': 'NA checkbox' }}
            />
            NA
          </Grid>
          <Grid item>
            <StyledInput
              value={value[0]}
              size="small"
              onChange={(event) => handleInputChange(event, 0)}
              inputProps={{
                step: 10,
                min: minValue,
                type: 'number',
                'aria-labelledby': 'input-slider',
              }}
              sx={{ width: 80 }}
            />
          </Grid>
          <Grid item>
            <Typography variant="body2">to</Typography>
          </Grid>
          <Grid item>
            <StyledInput
              value={value[1]}
              size="small"
              onChange={(event) => handleInputChange(event, 1)}
              inputProps={{
                step: 10,
                max: maxValue,
                type: 'number',
                'aria-labelledby': 'input-slider',
              }}
              sx={{ width: 80 }}
            />
          </Grid>
        </Grid>
      )}
    </Box>
  );
};
Then we can re-use this component by inputting the necessary data in it. It creates a little chaos, but in the end, it works well, in my opinion:
<MinMax name="City Population" questionMarkText="Enter minimum and maximum size for the city population" columnName="city_population" onMinChange={(value) => dispatch(setCityPopulationMin(value))} onMaxChange={(value) => dispatch(setCityPopulationMax(value))} onNAChange={(value) => dispatch(setCityPopulationIsNA(value))} isItActive={(value) => dispatch(setCityPopulationIsActive(value))} minChange={cityPopulationMin} maxChange={cityPopulationMax} NAChange={cityPopulationIsNA} activeChange={cityPopulationIsActive} />It let me cut down on a lot of lines of code eventually.
The Problems
Of course, we ran into a lot of issues while building LocationPro.
First, the front end had a lot of components that depended on each other, as I just mentioned. It caused a lot of problems. A small edit in a single component could cause a cascading effect triggering something else. I remember I spent 12 hours debugging an issue that was caused by some small thing.
Second, debugging can be a nightmare. Especially, when you don’t have much practice and don’t know what is going on. I think it wouldn’t be too bad right now as I gained experience.
Third, limited time was definitely going against us. On the other hand, it pushed us to work faster!
The Future?
I’d like to think with LocationPro we built something good. If you liked this app and want us to continue, leave a comment! If you want me to make a video on how to use it, leave a comment. And if you have ideas on how to improve something, leave a comment.
I host this app on my own hosting that I have been building for the last six months. It’s another story that I will be covering in this blog.

